Master the Art of Hanging Art on Brick Walls

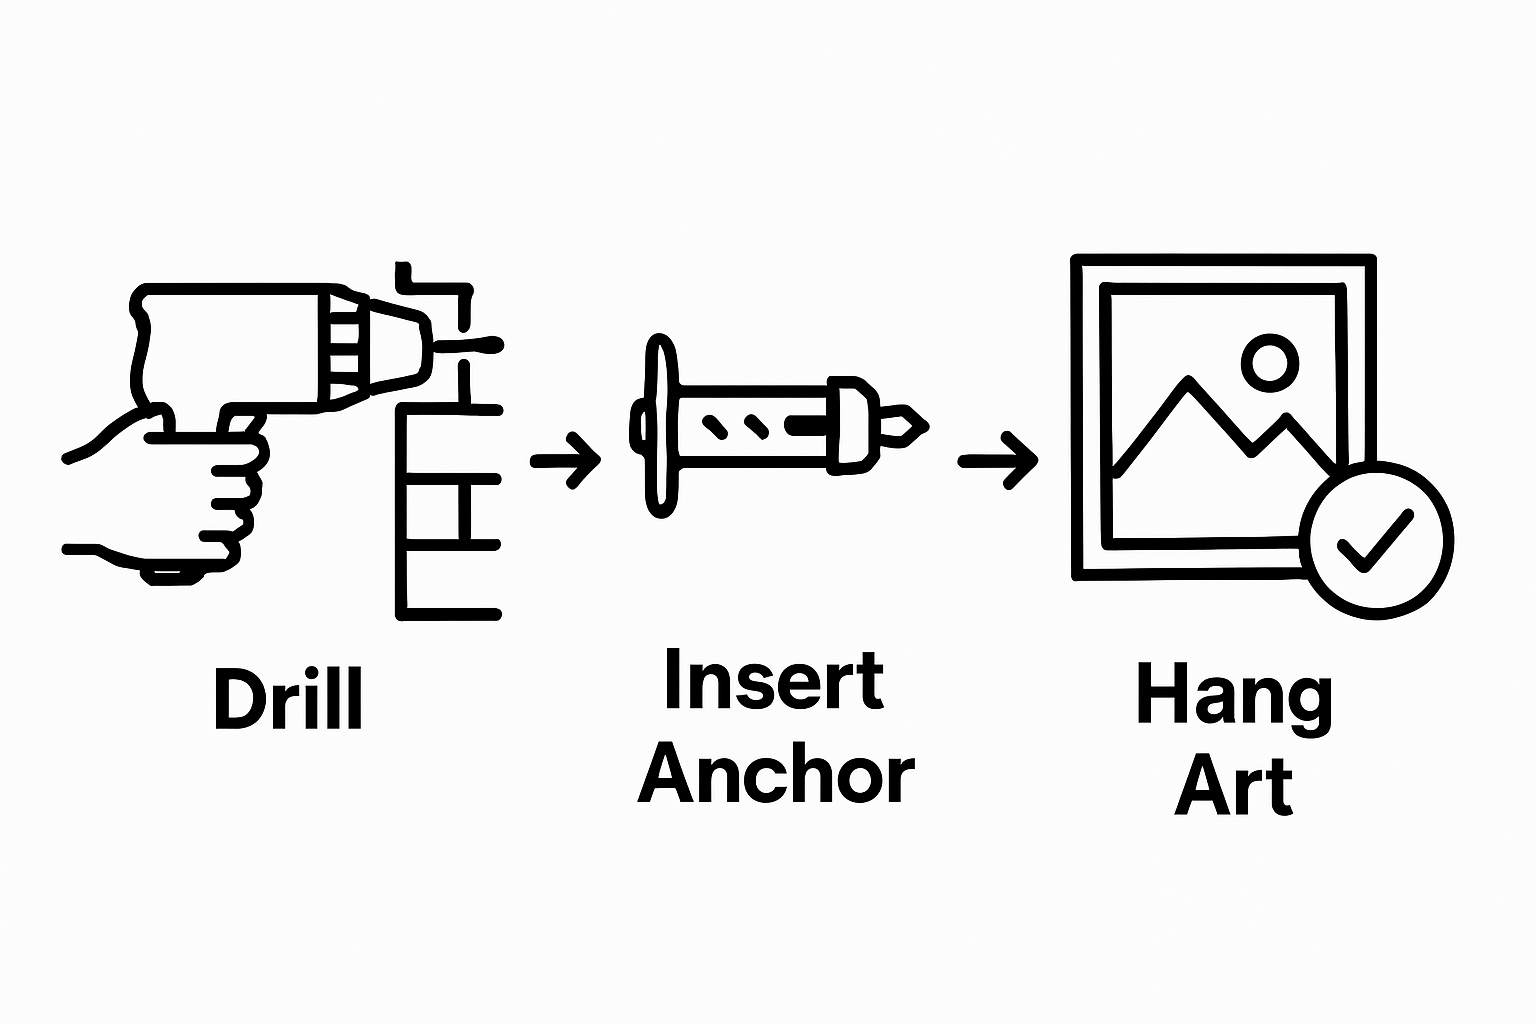
Hanging art on brick walls seems like a proper mission. Unlike plaster or drywall, brick does not play nice with generic tools and sticky hangers. But check this. A masonry drill fitted with carbide or diamond tips can pierce brick with almost zero risk of cracks or chips. Even more surprising, some clips can grip straight onto mortar lines without you turning on a drill at all. The safest way to hang your favourite work on a brick wall is actually easier than most people think.
Table of Contents
- Step 1: Gather Your Tools And Materials
- Step 2: Evaluate Wall Space And Design
- Step 3: Choose The Right Hanging Method
- Step 4: Securely Attach Art To The Wall
- Step 5: Verify Stability And Adjust As Needed
Quick Summary
| Key Point | Explanation |
|---|---|
| 1. Gather specialized tools and materials | Use a masonry drill and specific anchors for successful brick wall installations. This setup prevents damage while ensuring stability. |
| 2. Evaluate wall space meticulously | Assess texture, lighting, and patterns on the brick before hanging art to achieve a visually appealing arrangement. |
| 3. Select the right hanging method | Use brick clip hangers for lighter pieces and masonry anchors for heavier artworks to ensure secure mounting that withstands weight. |
| 4. Securely attach your artwork | Follow thorough installation procedures, double-check anchor points, and ensure artwork hangs level and stable on the wall. |
| 5. Regularly verify stability and adjust | Inspect mountings and check for any signs of instability or environmental impacts on your artwork’s attachment every six months. |
Step 1: Gather Your Tools and Materials
Before you begin hanging art on brick walls, gathering the right tools and materials is crucial for a successful and damage-free installation. Unlike other wall surfaces, brick requires specialized equipment and careful preparation to ensure your artwork remains secure and your wall stays intact.
Start by collecting your essential toolkit. You will need a masonry drill specifically designed for brick surfaces, which differs significantly from standard wood or drywall drills. These specialized drills have hardened tungsten carbide tips that can penetrate the tough brick material without causing unnecessary cracking or damage. Alongside your drill, select drill bits made for masonry – typically with a carbide or diamond-tipped design that can effectively create precise holes in brick surfaces.
Next, assemble your mounting hardware. For brick walls, wall anchors are not optional but mandatory. You will want heavy-duty sleeve anchors or expansion anchors specifically rated for masonry installation. These anchors provide the critical structural support needed to hold your artwork securely. Choose anchors that match the weight of your art piece – lighter pieces might require smaller plastic anchors, while larger or heavier artworks demand metal sleeve anchors with superior load-bearing capacity.
Your measurement tools are equally important. A laser level or traditional spirit level will help you ensure your artwork hangs perfectly straight. A measuring tape with clear markings and a pencil for marking drill points are essential. Consider using painter’s tape to create temporary placement guides that won’t damage your brick surface.
Protective gear matters too. Wear safety glasses to shield your eyes from brick dust and debris, and consider work gloves to protect your hands during drilling. A dust mask can help prevent inhalation of fine masonry particles.
Complete your toolkit with a hammer, screwdriver, and rubber mallet for precise anchor installation. These tools will help you set your anchors securely without causing unnecessary wall damage.
Below is a handy reference table outlining the essential tools and materials you need for a safe and reliable brick wall art installation, along with key notes on each item’s purpose.
| Tool/Material | Specification/Type | Purpose or Use |
|---|---|---|
| Masonry Drill | Carbide or diamond-tipped | Drilling precise holes in brick without damage |
| Masonry Drill Bits | Sized for anchors, carbide/diamond | Create clean, accurate holes in tough brick surfaces |
| Wall Anchors | Sleeve or expansion (metal/plastic) | Provide strong support appropriate for artwork weight |
| Level | Laser level or spirit level | Ensures artwork is hung straight and aligned |
| Measuring Tape | Clearly marked, standard length | Accurate measurement for placement and anchor points |
| Pencil | Standard | Marking drill and anchor locations on brick |
| Painter’s Tape | Low-adhesive | Temporary guides for placement; protects brick surface |
| Safety Glasses | Standard | Protects eyes from brick dust and debris |
| Work Gloves | Durable | Shields hands during drilling and handling equipment |
| Dust Mask | Disposable or reusable | Prevents inhaling masonry dust |
| Hammer/Rubber Mallet | Standard/rubber | Tapping anchors into place securely |
| Screwdriver | Suited to anchor screws | Tightening screws into masonry anchors |
Before starting, read our comprehensive guide on art material essentials to ensure you have everything needed for a professional installation. By carefully preparing your tools and materials, you set the foundation for a successful artwork hanging experience on challenging brick surfaces.
Step 2: Evaluate Wall Space and Design
Carefully evaluating your brick wall space and design strategy is a critical step that transforms your artwork hanging from a simple task to a thoughtful aesthetic experience. Brick walls present unique challenges and opportunities that require meticulous planning and strategic consideration.
Begin by thoroughly examining the brick surface texture and structural characteristics. Not all brick walls are created equal – some feature rough, uneven surfaces with deep mortar lines, while others might have smoother, more uniform textures. These variations significantly impact your artwork mounting approach. Run your hand across the wall, feeling its contours and identifying potential mounting zones that offer the most stable and visually appealing locations.
Consider the natural lighting and existing architectural elements surrounding your chosen wall. Brick walls often have distinctive color variations and shadow patterns that interact uniquely with light. Position your artwork where natural or artificial light will enhance its visual impact. Consider how morning sunlight or evening ambient lighting might create different visual experiences throughout the day. Avoid hanging pieces in direct harsh sunlight, which could cause fading or potential damage to more delicate artworks.
Measure your wall meticulously, using your laser level from the previous step to mark potential artwork locations. Pay special attention to brick pattern interruptions and mortar lines. While these can sometimes provide natural mounting points, they can also create visual complications. Some areas might require additional reinforcement or specialized mounting techniques to ensure artwork stability.
Artwork placement requires a strategic approach. Consider creating a visual balance that complements the brick’s inherent texture and color. Darker, textured brick walls might benefit from lighter or more minimalist artwork, while lighter brick surfaces could support more complex or vibrant pieces. The goal is harmonious integration between your wall and the artwork.
According to research from the University of Cape Town’s art curation policy, thoughtful artwork placement goes beyond mere decoration – it creates an environment that communicates aesthetic and cultural narratives. Take time to visualize how your chosen pieces will interact with the brick surface, considering factors like color, texture, and spatial relationships.
Verify your design by creating paper templates of your artwork and temporarily positioning them on the wall using painter’s tape. This technique allows you to experiment with placement without making permanent marks. Step back, assess the arrangement from multiple angles, and adjust until you achieve a composition that feels balanced and intentional.
By meticulously evaluating your wall space and design, you set the stage for a professional, visually compelling artwork installation that celebrates both the artwork and the unique character of your brick wall.
Step 3: Choose the Right Hanging Method
Selecting the appropriate hanging method for artwork on brick walls is a nuanced process that requires careful consideration of multiple factors. The unique texture and composition of brick surfaces demand specialized techniques that differ significantly from hanging art on drywall or plaster surfaces.
For lighter artworks weighing less than 10 pounds, brick clip hangers offer an elegant solution that minimizes wall damage. These ingenious devices grip onto the mortar lines between bricks, creating a secure mounting point without requiring drilling. They distribute weight evenly across multiple brick edges, reducing stress on any single point. Position these clips carefully, ensuring they grip solid mortar sections rather than crumbling or deteriorated areas.
Heavier artworks require more robust mounting strategies. Masonry anchors become essential for pieces exceeding 10 pounds. These specialized anchors expand inside the brick’s interior when installed, creating a remarkable grip that can support substantial weight. Select anchors specifically rated for brick – sleeve anchors or expansion anchors work best. The installation process involves drilling precise holes at a 90-degree angle, carefully matching the anchor’s diameter and depth to manufacturer specifications.
This comparison table helps you select the optimal hanging method for your brick wall art, summarising best use cases, suitable artwork weight, and key benefits for each approach.
| Hanging Method | Recommended Artwork Weight | Suitable For | Key Benefits |
|---|---|---|---|
| Brick Clip Hangers | Up to 10 pounds | Lightweight pieces, renters | No drilling required, minimal wall damage |
| Masonry Anchors | Over 10 pounds | Large/heavy artworks | Strong, secure hold; ideal for permanent mount |
| Plastic Expansion Anchors | Up to 8 pounds | Small artwork, temporary | Easy to install; removable; moderate support |
| Sleeve Anchors | 10 pounds and above | Heavy framed works | Superior load-bearing; maximum stability |
| Wall Clips (adjustable) | Up to 10 pounds | Uneven or rough brick | Flexible grip on mortar lines |
Consider the artwork’s weight, size, and frame design when choosing your hanging method. Delicate or antique frames might require gentler mounting techniques, while contemporary pieces with robust frames can withstand more aggressive installation methods. Always err on the side of over-engineering your mounting strategy – a secure artwork is far preferable to one that risks falling.
When drilling into brick, drill perpendicular to the wall surface, using your masonry drill with a carbide or diamond-tipped bit. Apply steady, moderate pressure without forcing the drill. Move slowly to prevent brick cracking or creating unnecessarily large holes. After drilling, clean the hole thoroughly, removing dust and debris that could compromise anchor performance.
According to research from the University of Pretoria’s ‘Art Beyond Walls’ initiative, the method of displaying art extends beyond mere technical considerations. It involves creating meaningful connections between the artwork, its environment, and viewers.
Verify your hanging method’s effectiveness by performing a gentle pull test after installation. Ensure the artwork feels secure and level, with no wobbling or potential for unexpected movement. If any uncertainty exists, consider consulting a professional art installer who specializes in brick wall installations.
Remember that patience and precision are your greatest allies when hanging art on brick walls. Each mounting decision requires thoughtful execution to preserve both your artwork and the integrity of your unique brick surface.
Step 4: Securely Attach Art to the Wall
Securing your artwork to a brick wall requires precision, patience, and a methodical approach that goes beyond simply hanging a piece. The process demands careful attention to detail to ensure both the safety of your artwork and the integrity of your brick surface.
Begin by double-checking your anchor points and marking locations with painter’s tape. This temporary guide helps prevent unnecessary drilling mistakes and provides a clear visual reference for your final placement. Use your laser level to confirm that these marks are perfectly aligned, accounting for any slight irregularities in the brick surface that might cause uneven hanging.
When drilling into brick, maintain a consistent and controlled technique. Insert your masonry drill bit at a perfect 90-degree angle, applying steady but gentle pressure. Move slowly to prevent cracking or chipping the brick. Each drill hole should be slightly smaller than your chosen anchor to ensure a tight, secure fit. Clean each hole meticulously using a small brush or compressed air, removing all dust and debris that could compromise the anchor’s grip.
Install your masonry anchors with precision. For heavier artworks, sleeve anchors provide the most reliable support. Gently tap the anchor into the drilled hole using a rubber mallet, ensuring it sits flush with the brick surface. The expansion mechanism inside the anchor will create a strong, load-bearing connection that can support significant weight. For lighter pieces, consider using plastic expansion anchors that offer a lighter-weight solution while still providing robust support.
Carefully attach your artwork’s hanging hardware to the installed anchors. If your piece uses wire backing, ensure the wire is taut and centered. For pieces with D-rings or bracket hangers, align them precisely with your pre-drilled anchor points. Use screws that match the anchor type – typically hardened steel screws designed for masonry applications. Tighten these screws carefully, avoiding over-tightening which could compromise the anchor’s structural integrity.
According to the George Municipality’s Visual Artwork Management Policy, artwork installation is not just a technical process but an opportunity to enhance cultural and aesthetic spaces. Your careful approach reflects this deeper appreciation of art presentation.
Perform a final security check by gently but firmly testing the artwork’s stability. Apply light pressure to ensure the piece doesn’t wobble or shift. Check that the artwork remains level and sits flush against the brick surface.
 If you detect any movement or instability, revisit your anchor installation and make necessary adjustments.
Remember that patience is your greatest ally in this process. Take your time, work methodically, and prioritize both the artwork’s display and its long-term security. A well-mounted piece not only looks professional but provides peace of mind that your treasured art is safely and beautifully displayed.
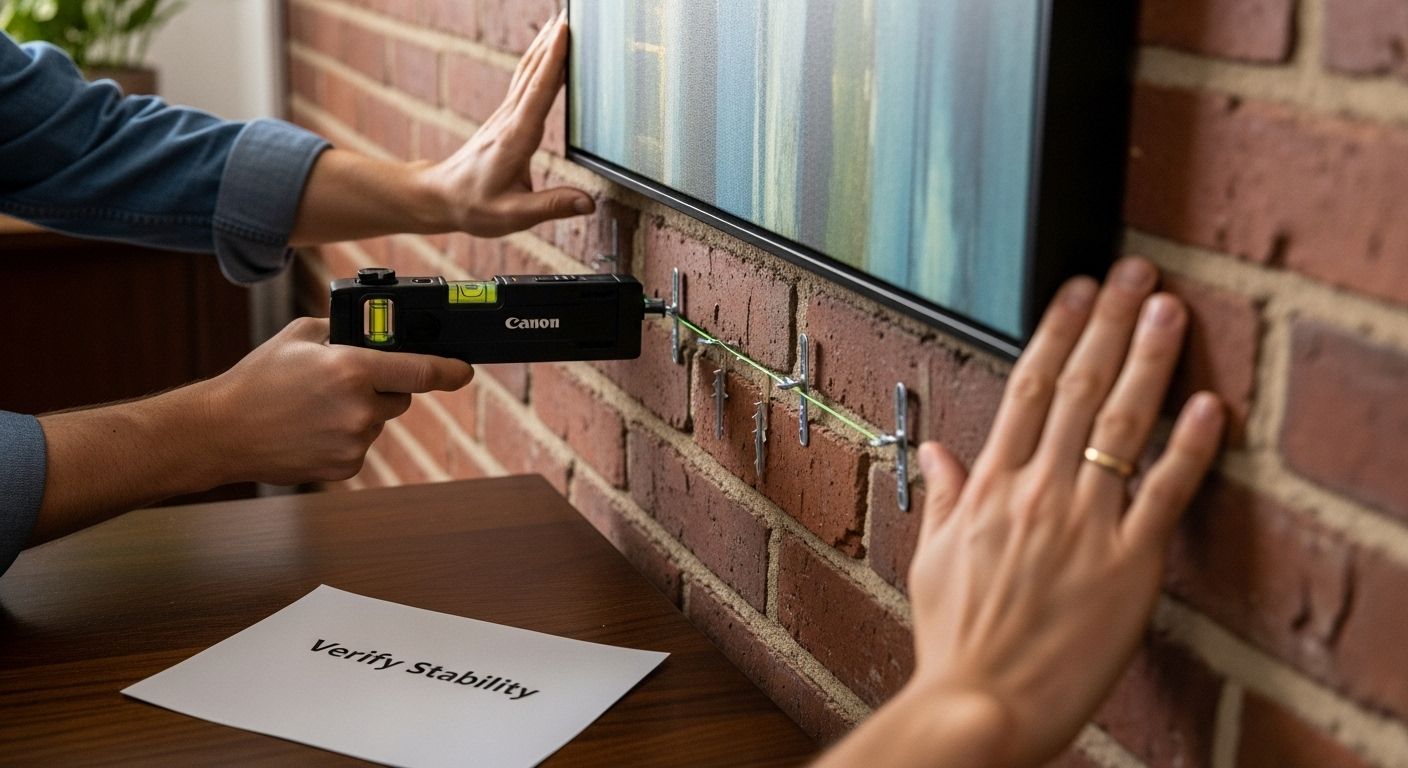
Step 5: Verify Stability and Adjust as Needed
Verifying the stability of your artwork on a brick wall is a critical final step that ensures both the safety of your piece and the integrity of your wall. This process goes beyond a simple visual check, requiring a methodical and thorough approach to guaranteeing long-term security.
Begin with a comprehensive visual inspection. Step back and observe your artwork from multiple angles, checking for any subtle signs of misalignment or instability. Look closely at the points where your hanging hardware meets the brick surface. Even the slightest deviation can indicate potential future issues. Use your laser level once more to confirm that the artwork remains perfectly horizontal and vertically aligned.
Perform a gentle stability test by applying light, controlled pressure to the artwork. Place one hand on the frame’s edge and apply gentle, consistent pressure to check for any unexpected movement. A secure installation should feel firm, with no wobbling or shifting. Pay special attention to the corners and center of the piece, as these areas often reveal subtle mounting inconsistencies. If you detect any movement beyond a millimeter or two, it’s a clear signal that adjustments are necessary.
Check the anchor points meticulously. Examine the area around each drill point for any signs of stress or micro-cracking in the brick. Look for tiny fissures or dust accumulation that might indicate the anchor is not seated perfectly. These subtle indicators can be early warning signs of potential future instability. If you notice any concerning details, it may be worth removing the anchor and reinstalling it with additional care or consulting a professional.
Consider the environmental factors that might impact your artwork’s long-term stability. Brick walls can experience subtle movements due to temperature changes, humidity, or building settlement. Areas near windows or external walls might be more prone to these variations. Take note of any seasonal temperature fluctuations in your space and how they might affect the mounting.
According to a structural performance study from Stellenbosch University, masonry walls can have significant variations in their load-bearing capabilities. This underscores the importance of careful, ongoing assessment of wall-mounted items.
Establish a maintenance schedule for your artwork. Plan to check the installation every six months, looking for any changes in stability or signs of wear. This proactive approach allows you to address potential issues before they become significant problems. Use a small notebook to track your observations, creating a record of the artwork’s condition over time.
If you detect any persistent instability or have any doubts about the installation, do not hesitate to consult a professional art installer or masonry expert. Your artwork represents not just a decorative element, but a treasured piece of your personal space that deserves careful protection and maintenance.
Turn Your Brick Walls into a Curated Masterpiece with Art Online
Transforming a brick wall into a gallery space is both exciting and challenging. You have just mastered how to safely hang your prized collection by finding the right masonry tools, precision in mounting, and checking for long-term security. However, you may still feel stuck when it comes to choosing the perfect artwork that stands out against unique brickwork, or finding pieces that harmonise with your space and endure over time.

Art Online helps you go beyond installation by offering an unrivalled selection of original South African artwork ideal for every type of brick surface and design preference. Start your art discovery journey by browsing South Africa’s largest online art gallery at Art Online. Find pieces from famous local artists who understand the balance of colour, texture, and cultural expression suited for your space. Visit Art Online’s homepage now to explore, choose, and get your favourite pieces delivered directly to your door. Experience the pride of displaying exceptional art on your brick walls and create a remarkable focal point in your home today.
Frequently Asked Questions
How do I choose the right drill for hanging art on brick walls?
You should use a masonry drill specifically designed for brick surfaces. These drills have hardened tungsten carbide tips that penetrate the tough brick material effectively, without causing damage.
What type of anchors should I use for heavy artworks on brick?
For heavier artworks exceeding 10 pounds, you should use masonry anchors, such as heavy-duty sleeve anchors or expansion anchors, which provide the necessary structural support for securely mounting your artwork.
How can I ensure my artwork hangs straight on a brick wall?
To ensure your artwork hangs straight, use a laser level or spirit level to measure and mark the placement accurately before installation. This will help you maintain alignment and prevent a crooked display.
What are the best practices for securing art on uneven brick surfaces?
For uneven brick surfaces, choose mounting hardware that grips onto stable mortar lines between bricks. Additionally, utilize adjustable mounting techniques such as wall clips or specially designed masonry anchors that accommodate slight irregularities in the wall.